DIY Kitchen Remodel

I LOVE LOVE a good DIY Kitchen Remodel. The kitchen and the master bathroom were definitely the largest undertakings we have completed to date. From the moment I moved into our house, I knew the kitchen would be a project someday. I hated the old tile countertops with big grout lines and the ugly worn yellow oak cabinets. I had spent years (literally) researching the cost of this undertaking and the options we had with hired help vs DIY. All my numbers kept coming back with the same answer, new cabinets were not an option. We could do the rest of the remodel on a reasonable budget, but the cabinets were going to push us over the edge. I looked at different paint options but the fact was I didn’t want them to look painted, I wanted them to look stained and natural.
Then one day, a friend of mine told me about the Rustoleum Cabinet Restorations Kit which was a total GAME CHANGER!
This product was EXACTLY what I was looking for! It is painted, however, no sanding is required and the best part is, the glaze makes it appear to be a stained product!
This is what my kitchen looked like before….

The one thing I will say about this project is, you may want to do it in the summer. I choose to start the project in the middle of winter so using outdoor space for the cabinet doors was not an option. With the four-step process in this kit, you will need to accept the fact that the doors will all be off for a week MINIMUM.
Part of my budgeting for this project was new appliances. Our oven was acting up (recently it had decided not to work on Christmas Eve while the prime rib was supposed to be cooking…. sadness!), our stovetop was extremely small for the amount of cooking we do, we knew we would need a new sink since we were getting new counters and so on and so forth.
I am an avid online shopper so that was my first stop in research. Due to shipping times varying I decided to buy all of my appliances early on.

- Remove all cabinet doors and drawer faces.
- Wipe all areas to be painted THOROULY with the deglosser from the Rustoleum Cabinet Transformation Kit

- Paint all doors and drawer faces with base paint color

- Paint all cabinets with base color

- apply glaze to all painted surfaces
- apply poly finish to entire project
For our project, I wanted a fully functioning kitchen as long as possible so I choose to wait to remove the existing countertops until a few days before my new ones were delivered. This did come with the risk of damaging the redone cabinets during the demo. This choice is totally up to you and your family’s needs. We used a thick plastic to protect the cabinets and for the most part, it worked out pretty well. we had a few touch-ups but nothing too bad. The biggest surprise was that the counter tiles pulled off a good row of sheetrock so we had to do a bit of repair on that before the new counters came in.


Next came the fun part!!!! I ordered my counters from a local discount outlet. This, like cabinets, is a tremendous money-saving aspect of your remodel. SHOP AROUND! Big-name stores and “designer home showrooms” will charge you noticeably more than discount outlets. In my shopping, I found almost a 50% markup in some locations – for the same product!
As for the product, everyone has their own style however this is what I learned from the people I spoke to at the varied stores. Yes, Granite and other natural stones are beautiful but they come with a price. Not only can they be pricey, but they also generally require upkeep. Granite needs to be sealed frequently or it will stain. Quartz is also nice however it stains easily as well.
My recommendation is engineered stone. This product is generally made with 90% quartz. It is heat resistant, scratch-resistant, easy to clean, and durable. A great option for families with little ones!

- Next came setting the stove top, faucet, installing the new oven and placing all the new hardware on the cabinets.
- We also choose a simple subway tile for the backsplash

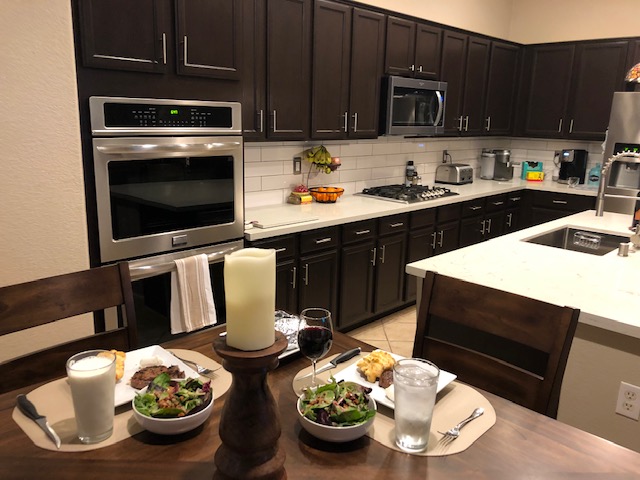
Here is our final product. We are so pleased with how it all came out. Aside from hiring a company to install the countertop slabs, we did it all ourselves. There is no better feeling than sitting down to enjoy a nice meal in a new kitchen that you know you worked hard to complete. I hope you have fun completing your DIY Kitchen Remodel too!


